Showing posts with label sewing. Show all posts

3.19.2015

2 years 7 months

That's exactly how long that darn sweater of death was on the needles.  And 1 week ago I was rejoicing and had such a huge weight off my shoulders!  I finished the darn thing.  Granted I still have to block it which might be time consuming but should be easy enough.  Then there is the dreaded installation of a zipper.  I'll be damned if it's not perfect though.  There's this voice inside me that just says "get it done!  who cares if its not perfect, you will be 100% done with it".  And boy do I want to give into that voice just a little - but I know better.  After almost 3 years of work on this sweater I don't want to screw up something so "little" as the zipper.  That's in quotes since really nothing about this sweater is even near little.  But I want it to be great!  I want my hubs to show it off.  I want him to boast "my wife made this for me!!"  If that zipper is half-assed I'd be hiding behind a rock somewhere when he says that instead!  So here it is -  the sweater off the needles and on a model way too small for it.  There will be a photo shoot when it is really DONE - that was one of the conditions in making this sweater.  I don't care how much my husband hates the camera!

This picture is so awful and was just meant for my hubs.  Feel special that I'm sharing it with you.  Very special.
 
Now that this is done and I have my sewing room back I'm been going crazy with sewing projects.  I've been doing well with my "finish what you start" theme for 2015 and have intentions of finishing one sweater and ripping one sweater.  Then the plan is to start the lovely Artemisia Sweater and follow the sister Craftsy class for it.  Hopefully that will keep me on track!!  I'll leave you with my latest FO and yes - that sure is some of the very coveted Frozen material (i found a steal on it!)

7.27.2014

All Too Fast

Things are happening fast around here.  I might be having my household goods packed up in as little as a week to two weeks.  It's a bit of a whirlwind and I'm trying to prepare for the idea of a few weeks in this house (and the next) without our stuff.  We are planning to drive both cars so everything we have will have to fit in the two cars.  This means no furniture.  Maybe a camp chair or two, and an air mattress.  This is where the dilemma comes in.....where is my toddler going to sleep?  She's too small for an air mattress, plus we'd have to buy one.  And if it was just a night or two she would be fine on the floor, but for a possible month or so?  I needed something else.  And of course I turned to Pinterest.    I saw a lot of tutorials for these types of sleeping mats made out of pillows.


But I didn't want something that was going to take up so much room in the car, especially because at the time we weren't even sure if we would have to pack everything into one car.  These sleeping mats are made from pillow cases and pillows, so I started brainstorming.  What is soft, can roll up smaller and will be comfy enough for Miss A to sleep on?  Thats when I thought of my yoga mat, which was a thick foam one, not the thin grippy ones).  Honestly I would prefer a new thinner one for yoga, and the one I had was ripped up from the cats. So I decided to upcycle the one I have for Miss A. 

I let her pick out some flannel material (which I of course used a coupon to buy)!  She picked out some owls - takes after Momma!  The mat I had already had velcro straps at the end so I put buttonholes in the bottom to pull the straps through.  I cut the end off so it was more appropriately sized for a toddler.  Attached some coordinating material at the top and stuffed it with polyfill. It's by no means professional, but  I'm very happy with my final result.  I'm not the only one happy with it.  Miss A hasn't left it for longer than 10 minutes the whole morning!  I think she will be more than happy to sleep on it.


7.18.2014

New Endeavor

It all started when the girl next door came to babysit.  She asked if my daughter had Barbies they could play with.  Well, honestly I had never even thought to buy her a Barbie.  And I think she's at the right age to start.  Not everyone is a "Barbie person" but she was one of the only dolls I played with growing up and definitely the one who's memories are still picture perfect in my head.  I loved playing with them.


So of course the next time I went out, I bought her a Barbie.  Just a cheap "swimsuit" one to see how well Miss A played with her, or even if she showed any interest.  Well that Barbie rarely leaves her side.  She went in the bath, pool and bed with her.  But I felt like her "clothes" really should cover a bit more and decided I needed to make some Barbie clothes.  Found some patterns on Pinterest and it all started from there.

I am obsessed with making Barbie clothes now.  They are so cute.  So simple.  So fast.  And, they take up all my scraps!!  And really, don't they make her look a lot more classy?  I've decided to continue making them.  Again and again.  And sell them.  I'm finally at the point, after years of people telling me to, that I'm making an Etsy shop. I plan to sell Barbie clothes, but also other small accessories.  Maybe handspun yarn, maybe some dyed yarn.  And definitely some shawls.  I have a problem knitting shawls I never want to wear.


Then the hard part came.  Coming up with a name.  Something not too specific as far as craft.  So ideas are Annabug Alley, Annabug Lane or Sew Lovely.  Please share any suggestions, or opinions!!  I would appreciate any feedback!

An FO Friday Post.


7.14.2014

Bitten

The crafting bug sure has bitten me.  It's definitely come back in complete full swing since I've returned home.  I honestly can't say if it has put me in a better mood, or if I'm crafting more because my mood has drastically increased.  I'm not sure, but it is what it is and I've been happy!  It started with the Ball.  Well everyone was preparing for the 4th of July weekend, I was stressed out.  In a good way.

On July 2nd, we had my husbands Redeployment Ball.  My first (and at the time I also thought my last) super formal military ball.  I found out a few months ago and of course my first thought was I need a dress!  Well since I was stuck at my parents for longer than I would have preferred a project was a good distraction.  My Mom and I immediately found dress pattern and material.  We made my ball gown together. I learned a lot from her.  It's nice to have support.  I hemmed it when I returned here.  Then made my handbag solely myself, which makes me super proud!   I used the Ziplet Zipper Pouch from the Craftsy website.

(of course the pictures are awful quality from my iPhone.  the camera came in the mail that night)


This really should just be the start of a lot of posts.  Both finished objects and WIPs.  Looking forward to sharing more zoo.  Hopefully lots of better pictures as well!

4.17.2014

Best FO of All

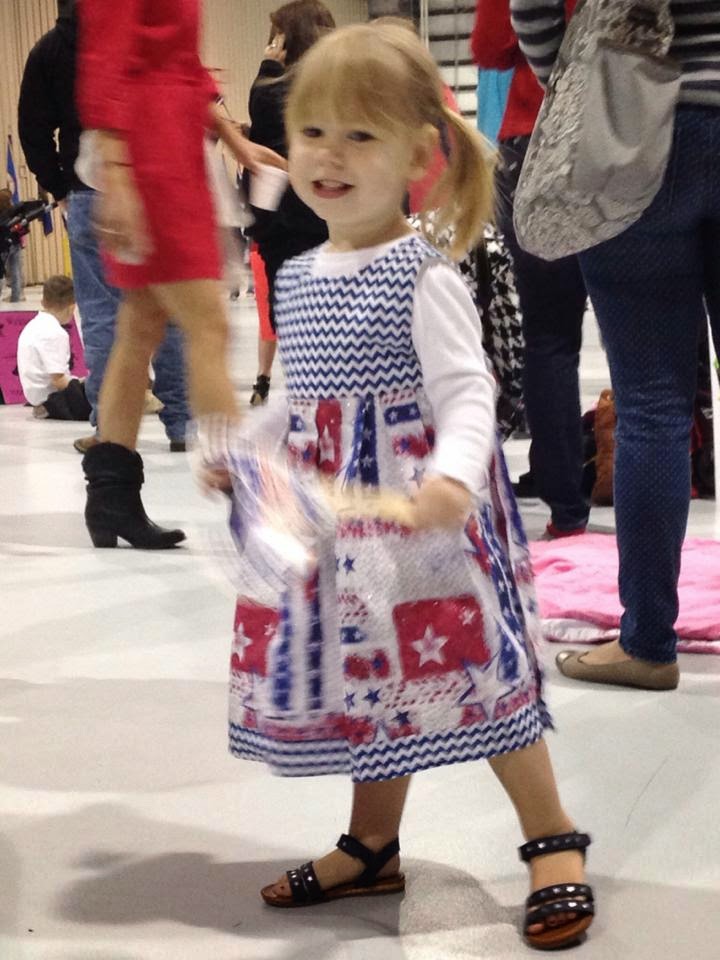
In my last post I may  may have mentioned my hubs is coming home soon.  Guess what?!  He came home Tuesday!   There is no other place ypu can go on any given day in any given country where you can experience as much pure joy as a Redeployment  (AKA Welcome Home) Ceremony.  We waited around for an hour and a half to become reacquainted with our Love!  And we girls of course were dressed for the occasion.  I put a lot of work into the dress I made for Miss A.  There was no skimping out and wearing PJs, even if it was way past her bed time!  The dress was perfect and in glad to have gotten a few compliments on it as well.  It was the little cherry on top of the triple decker sunday!  And I promised pictures!


4.15.2014

Soon is Never Soon Enough

Front
I may have been kind of sad on the knitting front lately.  Alas, I do have progress to show elsewhere! My sewing machine!  Honestly, I haven't been comfortable sitting lately.  It's making me feel like a bit of a lazy butt so the sewing involves being upstairs, not in front of my tv, and moving around a lot.  So it's where most of my creative outlet has been.  I really started the slew of sewing with Miss A's "welcome home" outfit.  A dress I wanted to make for her to wear to her Daddy's redeployment ceremony.   A dress she will be wearing soon, very, very soon.  But really when you've gone 9 months without your spouse or Daddy soon is never really soon enough, is it?  Maybe some of you know what I'm talking about.


Back
Back on topic though, I had a lot of this very patriotic material I bought when my JoAnn's was having a moving sale.  To me, it was a bit too busy for a whole dress though, so I wanted to combine it with other material and decided to use this pattern I had in my library.  It's called Paper Fan Dress and I printed because it was free and in my head that was too good to last.  I was sure it was a promotion but take a peek!  It's still free on Anna Maria Horners site along with some other cute free patterns!  I might be adding a few others to my library shortly.  I wish I could tell you how I found her page, but I honestly don't remember.  Anyway, I found some blue chevron to match with the material and I'm very happy with the result.  I'm sure I will share photos of it actually on the kiddo (along with Daddy!!) soon!

I did recently subscribe to a blog I love.  She has wonderful sewing tutorials.  I'm pretty sure I found her through Pinterest since I follow a great deal of sewing boards.  The blog is Make It and Love It.  I highly suggest checking it out.  Today I will be linking up to her weekly You Made You Love It post so click over and go read more posts like mine!

4.05.2014

A Simple DIY Headband

So I chopped my hair.  It's not a cut I never had, but it's a cut no one I really know here has seen me with.  Its short.  I love it short, but it definitely takes a bit of styling time.  I wanted something I could do with my hair on laid-back "i don't care" days.   I started looking up ideas for head wraps on Pinterest.  Made a few and came up with an idea of my own.

Do you sew? If you've sewn with knits you will know that when cut in thin strips the material curls up on itself.  This is also known in the DIY world as t-shirt yarn (except I didn't use an old t-shirt). I had two long pieces like this.


My immediate thought was I could braid these strips and make a headband, but braid - with two pieces?  Doesn't exactly work.  So I dug into my memory of old school boondoggle days.  Remember that stuff?  I spent hours at camp every summer with it.  I remembered something called the butterfly stitch.  I treated my strips just as they were pieces of boondoggle. They twisted here or there since they don't have a flat side like boondoggle, but I'm not s huge perfectionist so it didn't bother me.


Once the "braid" was long enough I wrapped it around my head and marked where I wanted the ends to join.  I'm not crazy about tying and having ends hang, so I opened the curl up of all 4 ends, stacked them on one another and sewed.  This headband has a nice stretch to it and stays on my thin hair.  I really like it and plan to make more.  Share with me if you make one!!

10.05.2013

A Bit of Instant Gratification

I actually have a few projects I've finished this week.  In fact if I shared everything with you I'd have 7 things to show you!  But that would consist of way too much typing.  So for now, sewing.  I really do love it and now I'm trying to work on quick things and not get involved in any big projects.  This is because the Craftsy Sew-Along for October is a wonderful dress I have purchased the material for and it starts Oct 15th. I don't want to have to finish something before I can start the dress!  I can't wait!  It's jersey though and I've never made a dress so I hope it's not too difficult.  Let me know if you are participating too!


For this week I have two blankets to share!  I talked about the binding last week for my daughter's and I just went with splitting the difference and using each color for half the blanket.  Her's is now in the closet ready to be a Christmas gift.  And the kitty one is in a box packed and addressed ready to go.  It's for my best friend's daughter for when the new baby comes home.  These blankets are seriously super simple.  I had 1.5 yards cut, and just sewed on a matching blacket binding all along the edges.  If you want to do this make sure you buy two packs of blanket binding!

Also finally finished the pajama pants I started for myself!  I absolutely loved this fabric with garden tools and birds on it!  And they are just my colors!  I used a pattern for it, but I seriously had to cut 3 inches off the top.  They were WAY too big.  Still a bit big, but that makes a comfy pant so I'm not complaining much.

Linking up to Tami's Amis a little late.  It was supposed to publish yesterday but didn't for some reason.

6.28.2013

Sew Not What You Were Expecting

I finished a project!  And it wasn't knit.  I sewed a dress for my daughter.  Last week Jo Anns and Hobby Lobby both had the big $0.99 sale for Simplicity patterns.  I decided it was a good time to stock up and boy did it also give me the right motivation.  I found the perfect sundress pattern and some mighty adorable material (it came from Hobby Lobby) and got started.  My goal was to have it finished before we leave for our Green Bay vacation on Monday.  I really thought that was an unreachable goal to tell you the truth though.

A little background?  My Mom is a seamstress.  She's amazing.  I never will sew like her.  I made a skirt for myself when I was 13 and my sewing career pretty much came to a halt there.  Until I was a housewife.  I didn't have my Mom to hand things off to anymore so I bought a decent machine.  I knew a cheap "beginning sewer" machine wouldn't do it for me.  Especially when it comes to making sure his uniform is precise.  If I have a decent sewing machine I should make good use of it right?  So I made an apron, and packed it away for moving. Once I moved into this house I got a good little area in my room set up.  I wanted the satisfaction of sewing for my daughter.  After I failed Easter dress I was determined to succeed this time!  I'd say I satisfied that.  Don't you?


Front- I'll share a picture on my little girl once we have buttons.

Back - Simplicity 1673


Linking up to Tami's Ami's FO Friday!

6.24.2013

Almost As Good As Yoga

The past two days I've been up before my daughter.  I spent that time at my sewing machine since it's one of the few things I can't do while she is awake.  It's in our bedroom which isn't really a good playroom for her.  So I took advantage.  And while yesterday was a strange day (she slept till 10am) I was able to cut an entire pattern and the material for a sundress for Miss A, I also woke up with the hubs when he left for work this morning.  The idea of sitting down at the sewing machine for a bit was actually what got me out of bed!  I also spent a decent amount of time working away while she was awake since the hubs was home most of the day.  It's seriously as relaxing as yoga, I think.  It's a nice meditative craft.  I'm really learning to enjoy sewing, the more I understand what I'm doing.

In the midst of all this sewing, I decided I needed a pincushion.  I have a little box for my pins which works, but it would be nice to just have simple access sometimes.  Yes, I could knit one.  I could even sew one.  But I had recalled seeing cute pincushions in the past (maybe online, maybe at craft shows?) using canning jars.  I decided if I was going to find how to make one, Pinterest sure was the right place to look!  I found a tutorial for Mason Jar Pin Cushions and boy was it simple.  Found a scrap of material that was perfect.  I'd say it took me all of 15 minutes to make.  I'm quite happy with the final result.  What do you think? I know, it needs a better ribbon - something that matches the fabric.

The material was a Germany acquisition that I made a nursing cover out of.  I just have a little bit of scrap left.  I'm sorry I didn't get more into sewing when I lived there.  The fabric shop we had local was AH-mazing!  I'll leave you with a sneak peek of what I'm making for Miss A.  It will be so nice for her to have a new, hand-made dress when we go on vacation to Green Bay next week.